Difference between revisions of "Cerberus Vae III"
m (Text replacement - "'''Unique Loot''':" to "'''Strike-Specific Loot''':") |
m |
||
| (5 intermediate revisions by 2 users not shown) | |||
| Line 1: | Line 1: | ||
{{Activity Infobox | {{Activity Infobox | ||
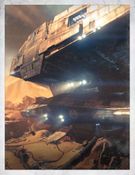
| + | |image=Cerberus vae iii banner small.png | ||
|Type=[[Strike]] | |Type=[[Strike]] | ||
|Location=[[Meridian Bay, Mars]] | |Location=[[Meridian Bay, Mars]] | ||
|Players=1 to 3 | |Players=1 to 3 | ||
| − | + | |Tier 1 Level= 18 | |
| − | + | |Tier 2 Level= 320 | |
| − | |Tier 1 Level=18 | + | |
| − | |Tier 2 Level= | + | |
|Tier 3 Level= | |Tier 3 Level= | ||
| − | | | + | |Bronze Tier=26,000 |
| + | |Silver Tier=39,000 | ||
| + | |Gold Tier=52,000 | ||
| + | |Description= | ||
}} | }} | ||
| − | + | ==Lore== | |
| + | ''"Whether we wanted it or not, we've stepped into a war with the Cabal on Mars. So let's get to taking out their command, one by one. Valus Ta'aurc. From what I can gather he commands the Siege Dancers from an Imperial Land Tank outside of Rubicon. He's well protected, but with the right team, we can punch through those defenses, take this beast out, and break their grip on Freehold."'' - Commander Zavala | ||
| − | |||
| − | |||
| − | |||
| − | |||
| − | |||
| − | + | __TOC__ | |
| − | |||
| − | |||
| − | |||
| − | |||
| − | |||
| − | + | ==Unlock== | |
| + | [[Cerberus Vae III]] is unlocked by default. It may be accessed from the Director by selecting its icon on [[Mars]]. | ||
| − | + | ==Enemies Encountered== | |
| − | ''' | + | '''Taken''' |
| + | *[[Captain]] | ||
| + | *[[Vandal]] | ||
| + | *[[Centurion]] | ||
| + | *[[Phalanx]] | ||
| + | *[[Psion]] | ||
| + | *[[Minotaur]] | ||
| + | *[[Hobgoblin]] | ||
| + | *[[Goblin]] | ||
| + | *[[Hydra]] | ||
| − | ''' | + | '''Cabal''' |
| + | *[[Colossus]] | ||
| + | *[[Centurion]] | ||
| + | *[[Phalanx]] | ||
| + | *[[Legionary]] | ||
| + | *[[Psion]] | ||
| + | *[[Goliath Tank]] | ||
| − | ''' | + | '''Vex''' |
| + | *[[Hobgoblin]] | ||
| + | *[[Goblin]] | ||
| + | *[[Hydra]] | ||
| − | + | ==Sub-bosses== | |
| − | === | + | ===Goliath Tank=== |
| − | + | Players may face a '''Goliath Tank''' en route to the boss. | |
| − | * | + | *[[file: X icon1.png|15px]] This sub-boss will not consume an active [[Three of Coins]]. |
| − | + | '''Mechanics''' | |
| − | + | Goliath Tanks will only sustain significant damage if one of their thrust engines is destroyed. Each tank possesses four engines, each of which is located on a corner of the main body of the tank. Although it is possible to destroy a Goliath without destroying all four of its engines, it is highly impractical. Goliaths are best fought from a distance as they possess a wide array of highly-damaging abilities designed to discourage close-quarters engagements. When engaging a distant target, the only method of attack available to a Goliath is its main cannon. The cannon must charge before each shot, giving players time to move behind cover; doing so will reset any accumulated charge. | |
| − | + | ||
| − | |||
| − | |||
| − | |||
| − | |||
| − | ''' | + | ===Taken Gatelord=== |
| + | Players may face a '''Taken Gatelord''' en route to the boss. | ||
| − | + | *[[file: Check mark icon1.png|25px]] This sub-boss will consume an active [[Three of Coins]]. | |
| − | + | ||
| − | + | ||
| − | + | '''Mechanics''' | |
| − | + | ||
| − | + | ||
| − | + | ||
| − | == | + | This boss features no unique mechanics and is functionally identical to a '''Taken Minotaur'''. |
| − | + | ||
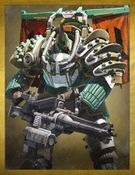
| + | ==Boss== | ||
| + | Players will face a Colossus known as a '''Valus Ta'aurc'''. | ||
| + | |||
| + | *[[File: Check mark icon1.png|25px]] This boss will consume an active [[Three of Coins]]. | ||
| + | |||
| + | ===Mechanics=== | ||
| + | |||
| + | This encounter features no unique mechanics; the boss may be damaged at any time with any weapon or ability. Adds (additional enemies) will enter the arena through the doors located on either side each time the boss' HP is reduced by 10%. Note that if a sufficient number of enemies are present when the boss' HP falls to the next increment of 10%, no additional adds will be summoned until the existing enemies have been eliminated. The boss has access to three attacks: | ||
| + | |||
| + | *'''Missile Volley''' - This attack lobs a volley of homing missiles toward the nearest player who has a clear line of sight to the boss. | ||
| + | **If the player who is targeted happens to be a [[Nightstalker]], he or she can use [[Shadestep]] to break the missiles' tracking. | ||
| + | *'''Gatling Gun''' - This is a concentrated attack similar to an Ogre's gaze. | ||
| + | **If the targeted player moves behind cover, the boss will continue to fire at the player's last known location for several (5 - 15) seconds. | ||
| + | *'''Stomp''' - This is the standard melee attack shared by all enemies in the Colossus family. | ||
| + | **This is a radial area-of-effect attack centered on the boss and is triggered when a player gets too close. Damage inflicted varies with proximity to the boss. | ||
| + | |||
| + | ==Rewards== | ||
| + | ===Boss Drops=== | ||
| + | |||
| + | {| class="wikitable" style="text-align: center; border-style: solid; border-width: 2px; border-color: #5076A3" | ||
| + | !colspan="2" style="background: #5076A3; color: #FFFFFF; padding:2px"|Boss Drops | ||
| + | !style="background: #5076A3; color: #FFFFFF; padding:2px"|Quantity | ||
| + | !style="background: #5076A3; color: #FFFFFF; padding:2px"|Drops From | ||
| + | !style="background: #5076A3; color: #FFFFFF; padding:2px"|Strike Playlist | ||
| + | !style="background: #5076A3; color: #FFFFFF; padding:2px"|Light Level Cap | ||
| + | |- | ||
| + | | style="padding:5px;"| [[file: Random rare engram icon1.png|50px]] | ||
| + | | style="padding:10px;"| '''[[Rare|Rare Equipment]]'''<br>''Random'' | ||
| + | | style="padding:10px;"| 2 - 5 | ||
| + | | style="padding:10px;"| Boss | ||
| + | | style="padding:10px;"| SIVA Crisis | ||
| + | | style="padding:10px;"| 365 | ||
| + | |- | ||
| + | | style="padding:5px;"| [[file: Random rare engram icon1.png|50px]] | ||
| + | | style="padding:10px;"| '''[[Rare|Rare Equipment]]'''<br>''Random'' | ||
| + | | style="padding:10px;"| 2 - 5 | ||
| + | | style="padding:10px;"| Boss | ||
| + | | style="padding:10px;"| SIVA Crisis Heroic<br>Nightfall | ||
| + | | style="padding:10px;"| 385 | ||
| + | |- | ||
| + | | style="padding:5px;"| [[file: Random legendary engram icon1.png|50px]] | ||
| + | | style="padding:10px;"| '''[[Legendary Engram]]'''<br>''Random'' | ||
| + | | style="padding:10px;"| 0 - 3 | ||
| + | | style="padding:10px;"| Boss | ||
| + | | style="padding:10px;"| All | ||
| + | | style="padding:10px;"| N/A | ||
| + | |- | ||
| + | | style="padding:5px;"| [[file: Skeleton key icon1.jpg|50px]] | ||
| + | | style="padding:10px;"| '''[[Skeleton Key]]'''<br>''Consumable'' | ||
| + | | style="padding:10px;"| 0 - 1 | ||
| + | | style="padding:10px;"| Boss | ||
| + | | style="padding:10px;"| SIVA Crisis Heroic<br>Nightfall | ||
| + | | style="padding:10px;"| N/A | ||
| + | |} | ||
| + | |||
| + | ===Strike Hoard Chest=== | ||
| + | |||
| + | {| class="wikitable" style="text-align: center; border-style: solid; border-width: 2px; border-color: #522F65" | ||
| + | !colspan="2" style="background: #522F65; color: #FFFFFF; padding:2px"|Strike Hoard Rewards | ||
| + | !style="background: #522F65; color: #FFFFFF; padding:2px"|Quantity | ||
| + | !style="background: #522F65; color: #FFFFFF; padding:2px"|Drops From | ||
| + | !style="background: #522F65; color: #FFFFFF; padding:2px"|Strike Playlist | ||
| + | !style="background: #522F65; color: #FFFFFF; padding:2px"|Light Level Cap | ||
| + | |- | ||
| + | | style="padding:5px;"| [[file: Treads upon stars icon1.jpg|50px]] | ||
| + | | style="padding:10px;"| '''[[Treads Upon Stars]]'''<br>''Scout Rifle'' | ||
| + | | style="padding:10px;"| 1 | ||
| + | | style="padding:10px;"| Strike Hoard Chest | ||
| + | | style="padding:10px;"| All | ||
| + | | style="padding:10px;"| 400 | ||
| + | |- | ||
| + | | style="padding:5px;"| [[file: Random legendary engram icon1.png|50px]] | ||
| + | | style="padding:10px;"| '''[[Legendary|Legendary Class Item]]'''<br>''Random'' | ||
| + | | style="padding:10px;"| 0 - 1 | ||
| + | | style="padding:10px;"| Strike Hoard Chest | ||
| + | | style="padding:10px;"| All | ||
| + | | style="padding:10px;"| 400 | ||
| + | |- | ||
| + | | style="padding:5px;"| [[file: Random rare engram icon1.png|50px]] | ||
| + | | style="padding:10px;"| '''[[Rare|Rare Class Item]]'''<br>''Random'' | ||
| + | | style="padding:10px;"| 0 - 1 | ||
| + | | style="padding:10px;"| Strike Hoard Chest | ||
| + | | style="padding:10px;"| All | ||
| + | | style="padding:10px;"| 400 | ||
| + | |- | ||
| + | | style="padding:5px;"| [[file: Random rare engram icon1.png|50px]] | ||
| + | | style="padding:10px;"| '''[[Rare|Rare Artifact]]'''<br>''Random'' | ||
| + | | style="padding:10px;"| 0 - 1 | ||
| + | | style="padding:10px;"| Strike Hoard Chest | ||
| + | | style="padding:10px;"| All | ||
| + | | style="padding:10px;"| 400 | ||
| + | |} | ||
| + | ==Grimoire Cards== | ||
| + | [[file: Cerberus vae iii grimoire card1.jpg|135px|link=Cerberus Vae III (Grimoire Card)]] [[file: Valus taaurc grimoire card1.jpg|135px|link=Valus Ta'aurc (Grimoire Card)]] | ||
| − | [[ | + | ==Related Links== |
| + | *[[Strikes]] {{Strikes}} | ||
Latest revision as of 18:41, 16 March 2017
| Cerberus Vae III | |
|---|---|

| |
| Information | |
| Type | Strike |
| Location | Meridian Bay, Mars |
| Players | 1 to 3 |
| Tier 1 Level | 18 |
| Tier 2 Level | 320 |
| Bronze Tier | 26,000 |
| Silver Tier | 39,000 |
| Gold Tier | 52,000 |
Lore
"Whether we wanted it or not, we've stepped into a war with the Cabal on Mars. So let's get to taking out their command, one by one. Valus Ta'aurc. From what I can gather he commands the Siege Dancers from an Imperial Land Tank outside of Rubicon. He's well protected, but with the right team, we can punch through those defenses, take this beast out, and break their grip on Freehold." - Commander Zavala
Contents
Unlock
Cerberus Vae III is unlocked by default. It may be accessed from the Director by selecting its icon on Mars.
Enemies Encountered
Taken
Cabal
Vex
Sub-bosses
Goliath Tank
Players may face a Goliath Tank en route to the boss.
 This sub-boss will not consume an active Three of Coins.
Mechanics
Goliath Tanks will only sustain significant damage if one of their thrust engines is destroyed. Each tank possesses four engines, each of which is located on a corner of the main body of the tank. Although it is possible to destroy a Goliath without destroying all four of its engines, it is highly impractical. Goliaths are best fought from a distance as they possess a wide array of highly-damaging abilities designed to discourage close-quarters engagements. When engaging a distant target, the only method of attack available to a Goliath is its main cannon. The cannon must charge before each shot, giving players time to move behind cover; doing so will reset any accumulated charge.
Taken Gatelord
Players may face a Taken Gatelord en route to the boss.
 This sub-boss will consume an active Three of Coins.
Mechanics
This boss features no unique mechanics and is functionally identical to a Taken Minotaur.
Boss
Players will face a Colossus known as a Valus Ta'aurc.
- This boss will consume an active Three of Coins.
Mechanics
This encounter features no unique mechanics; the boss may be damaged at any time with any weapon or ability. Adds (additional enemies) will enter the arena through the doors located on either side each time the boss' HP is reduced by 10%. Note that if a sufficient number of enemies are present when the boss' HP falls to the next increment of 10%, no additional adds will be summoned until the existing enemies have been eliminated. The boss has access to three attacks:
- Missile Volley - This attack lobs a volley of homing missiles toward the nearest player who has a clear line of sight to the boss.
- If the player who is targeted happens to be a Nightstalker, he or she can use Shadestep to break the missiles' tracking.
- Gatling Gun - This is a concentrated attack similar to an Ogre's gaze.
- If the targeted player moves behind cover, the boss will continue to fire at the player's last known location for several (5 - 15) seconds.
- Stomp - This is the standard melee attack shared by all enemies in the Colossus family.
- This is a radial area-of-effect attack centered on the boss and is triggered when a player gets too close. Damage inflicted varies with proximity to the boss.
Rewards
Boss Drops
| Boss Drops | Quantity | Drops From | Strike Playlist | Light Level Cap | |
|---|---|---|---|---|---|

|
Rare Equipment Random |
2 - 5 | Boss | SIVA Crisis | 365 |
|
|
Rare Equipment Random |
2 - 5 | Boss | SIVA Crisis Heroic Nightfall |
385 |

|
Legendary Engram Random |
0 - 3 | Boss | All | N/A |

|
Skeleton Key Consumable |
0 - 1 | Boss | SIVA Crisis Heroic Nightfall |
N/A |
Strike Hoard Chest
| Strike Hoard Rewards | Quantity | Drops From | Strike Playlist | Light Level Cap | |
|---|---|---|---|---|---|

|
Treads Upon Stars Scout Rifle |
1 | Strike Hoard Chest | All | 400 |
|
|
Legendary Class Item Random |
0 - 1 | Strike Hoard Chest | All | 400 |
|
|
Rare Class Item Random |
0 - 1 | Strike Hoard Chest | All | 400 |
|
|
Rare Artifact Random |
0 - 1 | Strike Hoard Chest | All | 400 |
Grimoire Cards