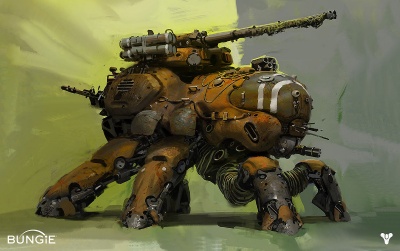
Devil Walker
| Devil Walker | |
|---|---|
| Information | |
| Type | Boss |
| Faction | The Fallen |
| Locations | Earth |
| Drops | ?? |
| Description | ??? |
Devil Walk can be found in strikes such as Devil's Lair and Public Events such as in Old Russia, Earth.
Contents
Attacks
Chain Gun: The devil walker has a bottom mounted chaingun that it has to be facing you to use, only really effective if you're at mid range and on the same level as the walker.
Ion Turret: An automatic firing swivel turret that can target foes the other weapons aren't trained on. This turret has a long range and does medium-high damage, but has a semi-large spread on the projectiles.
Main Cannon: A laser sight appears for several seconds, illuminating the location the main cannon will hit. The projectile itself will one shot you if you're hit, and will do 2/3rds damage if it's a near miss. If you see the laser it's time to move.
Drones: Flying Shrikes pooped out the sides of the walker. The drones change depending on what version of the devil walker you're fighting. The public event drones are much tougher, as they have shields that require a fast firing weapon to take down. These drones often drop ammo. The drones can stack, so if you're not killing them, they can quickly gang up on you.
Grenades: The walker will occasionally drop a series of bouncing grenades out the side. One grenade will do 1/2-2/3rds of your health bar in damage, as it's extremely easy to get comboed by several grenades. Don't stand close to the walker.
EMP Burst: The Walker will stand up a bit, before slaming down and knocking away enemies in a large electric burst. Does moderate damage and knocks you away.
Strategy
Target the legs: Any of the legs will work, but each leg has it's own health bar. You want to make sure you and your teammates are trying to take down the same legs in succession. Each leg destroyed will reveal the core at its neck.
The Core at the neck: You have a limited window of time/shots to hit the core. The core will remain open until you get at least one shot in. This is when you'd want to use rockets/supers. This does much massive damage to the devil walker.
- Target prioritization: Exposed core > ADD SPAWNS (minus Shanks) > Current Armored Walker Leg (When in line of sight) > Shanks > Other Armored Walker Legs (When current group target isn't visible from your location) > Unarmored Legs > Body
Tips
- Fusion Rifle will always do Precision Damage (yellow damage from shooting at its legs) to the boss, doesn't matter where you fire at the Walker.
- Find a safe spot or be ready to double the time it takes to kill him: If you're sprinting away from the main cannon, plasma balls or those awful bouncing mines you aren't shooting. I recommend the hallway to the right of the walker or the small gap in the concrete at the downed bridge in the middle.
- Pincher attack: Hopefully there's at least two people attacking the walker. In most cases you'll want to be close enough to each other to easily rez the other person, but far enough apart that the devil walker can't target you both. Don't stand next to each other, ever.
- Kill the Drones/Fallen: The easiest way to die is to either get hit by the main cannon, or by letting the other enemies whittle your health down. If you're at less than full health, there are an alarming number of the devil walkers moves that can easily kill you.
- Be aware of teammates: Even if you can't save a teammate, they'll automatically respawn in 20 seconds, so just don't die.
- Watch your ammo: If you're getting low, prepare to run to wherever your group killed the last spawn of adds.
- When you think your currently targeted leg is about to go down, make sure your heavy ammo is reloaded. It absolutely sucks to run up during the brief exposed core phase, switch to heavy only to realize you are either out of ammo or low in your clip.
- If you're going across the map for a revive, ammo or new cover, use your sparrow: It's quick, and you aren't likely to get targeted by a majority of the walker's moves.
- At higher difficulty, players should destroy the main cannon because of the massive damage it can do.

